While my desktop PC runs Linux I, like many other suckers, have an iPhone. I also use the calendar on my phone, and I want to have access to that calendar on my PC. This is entirely possible, but as with most situations where you try to combine Apple and the land of Tux, Apple do not make it straight forward or easy! Luckily, once you know how it’s done, it doesn’t actually take that long to set up.
This post on Ask Ubuntu helped me get this going. So here are the steps to take.
Gather Required Information
You need to have a URL to tell Lightning how to connect to your iCloud calendar. For this you need three pieces of information:
- The server where your calendar lives.
- Your dsid, which is a code that uniquely identifies your account.
- Your pGUID, which is a code that uniquely identifies your calendar.
Armed with this information your URL will look something like this:
https://p<Server Number>-caldav.icloud.com/<dsid>/calendars/<pGUID>
You also need to generate an app specific password (you can’t use your iCloud password) so Lightning can sign in to the server successfully.
Follow these steps to get your info.
- Use Firefox to go to icloud.com then open the Developer Tools window (press F12), and go to the Network tab.
- You need to generate some useful traffic to get your dsid and pGUID; so on the iCloud website open your calendar and create a dummy event (don’t worry you can delete it later).
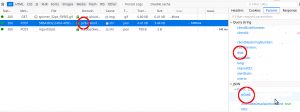
- In the Developer Tools window, select the entry (it should be a POST event of type json).
- The server number will be “PXX” and is listed in the Domain column, while the dsid and the pGUID can be found under the Params tab on the right.
- Now all you need is your app-specific password. On iCloud, click your name in the top-right, then click on iCloud Settings. From here click on the Manage ID link near the top of the page, and you’ll be asked to log in. From this point you can click the link to generate a new app-specific password and note it down for use in Thunderbird. Done!

Configure Thunderbird/Lightning
After you’ve got your details and built your URL and password combination, you can simply go to Thunderbird and from the Events and Tasks menu (available if you have the Lightning addon), select the Calendar item. On this page, there is a list of available calendars on the left. Right clicking in this list will offer the New Calendar… menu item, from where you can set up your iCloud connection. The options you need are:
- On the Network
- CalDAV
- Location: The URL that you put together
- Offline Support: Checked
After this you will be prompted for your username and password. These are your iCloud email address and the app-specific password that you generated.
To finish up I right clicked on the calendar and selected Properties so I could set the calendar to update every minute instead of every 30, which is the default. Not quite push notifications, but better than nothing!